Thursday, March 28, 2013

Car Travel - Part Six: Car Entertainment Bags

Only one more sleep until our road trip!  I've got a pile of bags sitting by the door ready to load up and go!  Whew!  The kids are excited, I'm excited, hubby excited...although both of us are a little wary of how all the prep for the car ride will go.  I hope we return with live children and we don't slaughter them on the way down to CA... ;)  (kidding of course!)

I have compiled an entertainment bag for each child.  One is 7 and the other is 3 at the time of this writing, so their needs and desires are different.  Besides the normal electronics (you know, stuff we didn't have when WE were traveling for long periods!) like DS player, DVD player, Mom and Dad's Kindles and iPods and smart phones...I wanted to "un-tether" them for stretches and torture them like I was tortured riding next to my brother.  I have divised a way to separate them (at least visually) from each other and in my test drives with the curtain, they are loving it.  We'll see how long it lasts for this drive!

But on to the car bags!


Here is the car bags in all of their glory.  We will be gone for 10 days and 6 of those will be on the road.  Hopefully, this will last us all 6 days.  The kids' initial bags are the pink and purple ones on the left of this picture.  They also will get the blue and pink binders and the 2 cookie sheets.  The large bag in the top right is Mom and Dad's bag (more on that below).


The little brown bags have a new toy or two for each leg of the trip (as well as a bonus bag on the day before Disneyland where they can dress up like Princesses with crowns, wands, and necklaces).  I've labled each bag with when to hand it out ("Sunday North" means the Sunday on our way home when we're headed north!).  Some blogs that I've seen similar ideas on suggest doing this every hour or every state, but I've decided to just go with a new bag a day.


The 7-year old's car bag...she's got tape, some word searches and a coloring book, crayons, and headphones.


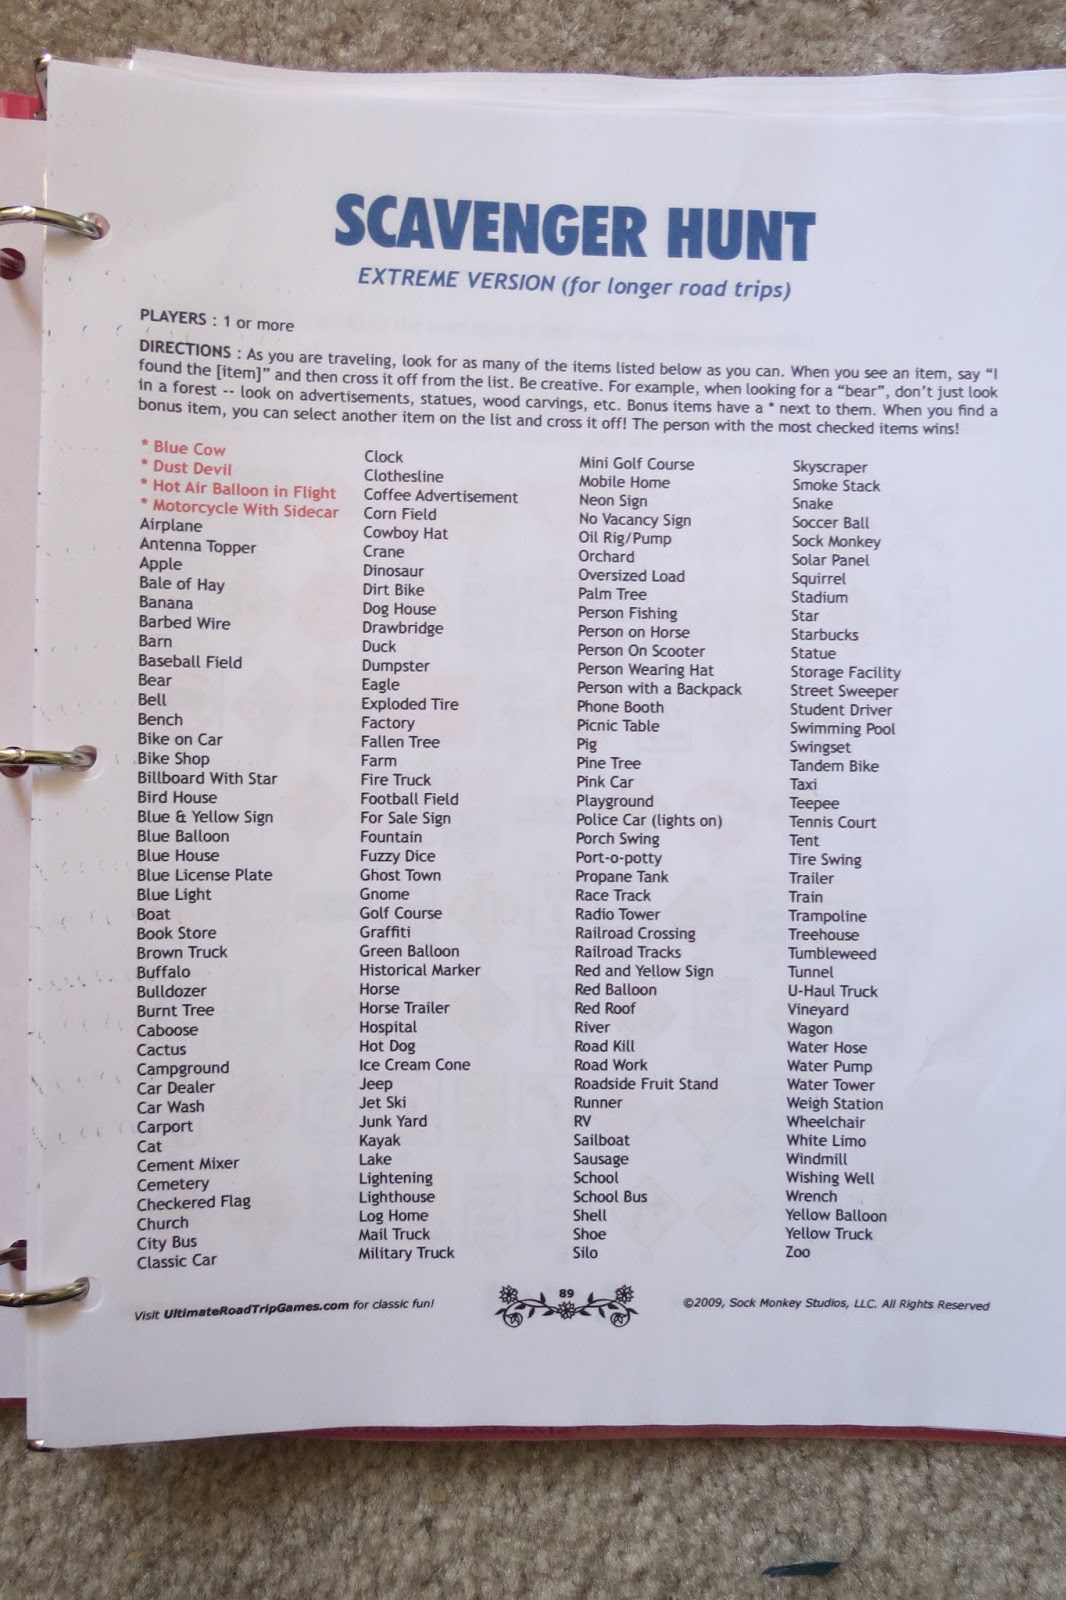
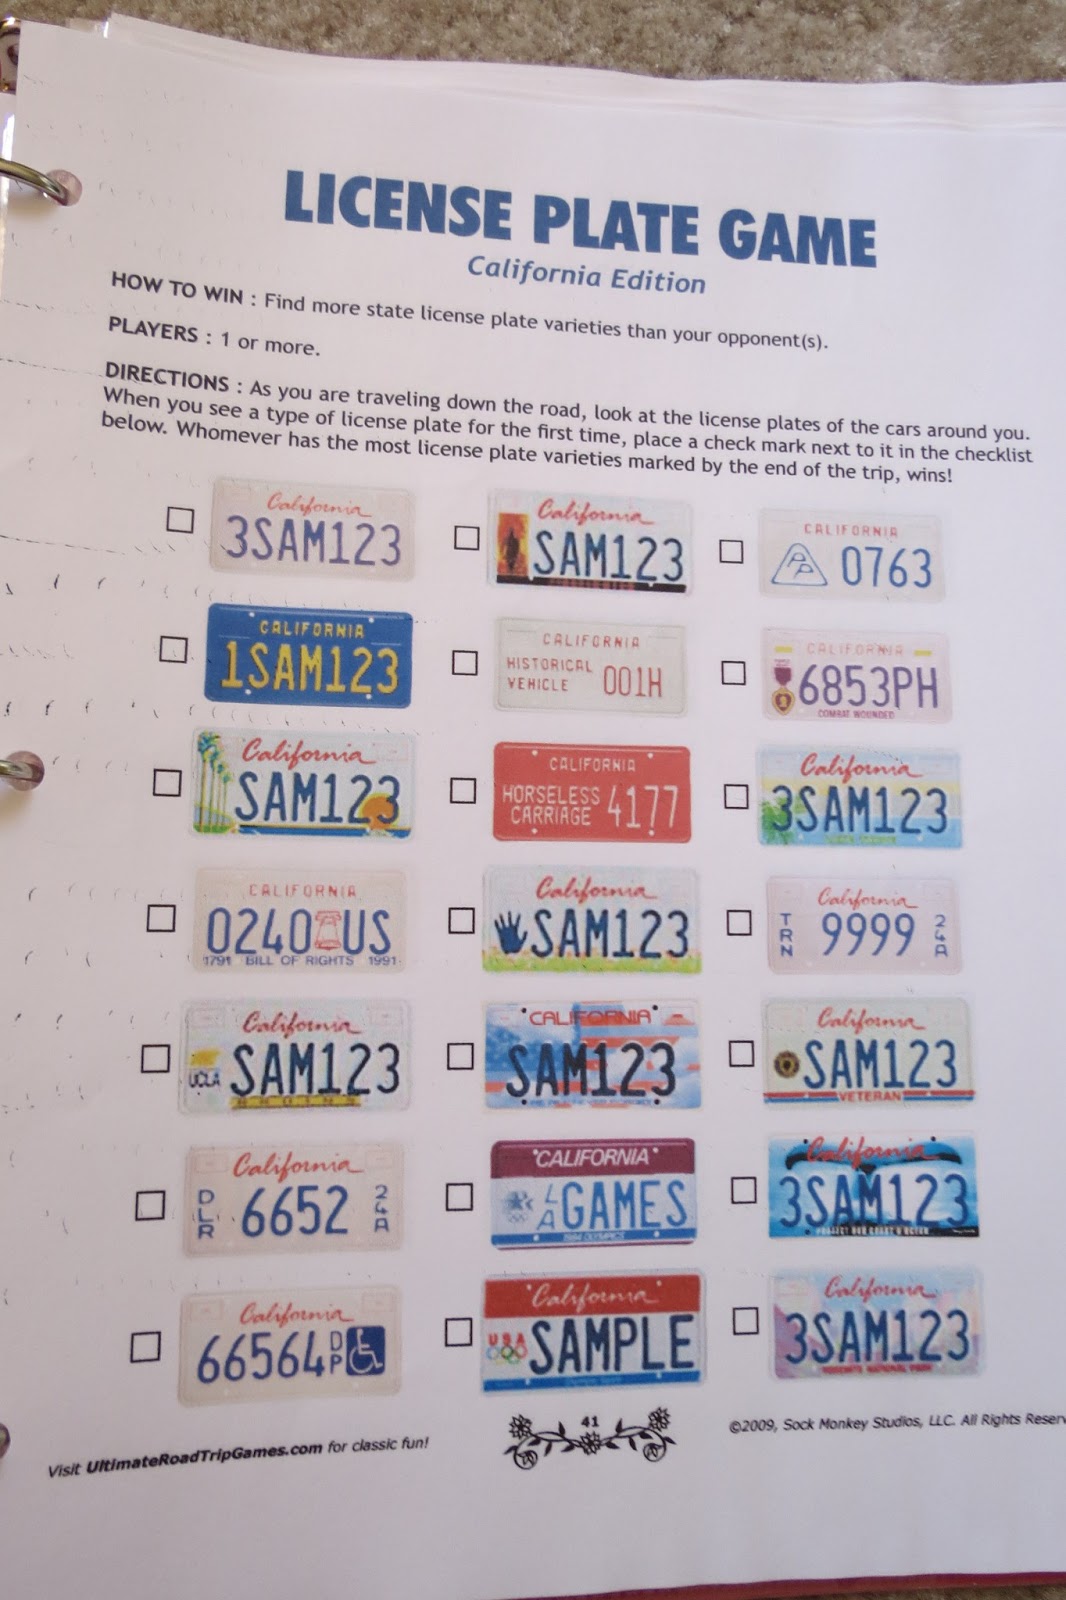
The Journey Maps (which I described in greater detail here), start out the 7-year old's binder.  There are several plastic sheets to keep everything contained.  The following pictures of activities in her binder I printed from the online ebook "Ultimate Road Trip Games" which can be bought for $15 and downloaded immediately.  Personally, I could have created each of these, but the money spent was worth it to me in stress and time.  I highly recommend this ebook!


 Sound Scavenger Hunt, Road Scavenger Hunt


The 3-year old binder is a bit different.  She can't read or play standby games like the license plate game, so it was more of a challenge to fill hers up.  It opens with a pouch to hold her crayons and dot stickers and a coloring book in the first plastic sheet holder.


Next are some Alphabet and Number Dot pages (where she will use the stickers found in the beginning of the binder).  


The older girl has some color by number sheets as well, but I needed to find some that didn't have math problems and was more user-friendly for a 3-year old!.  I found these online after a simple search.


Finally, the grownups bag holds our kindles and our own entertainment as well as paperwork for the trip and a big fat file folder filled with extra sheets for the girls:


...more sheets of the games and printables for both of the girls - they didn't get ALL of the color by number sheets or the alphabet dots at once...hopefully this will stretch out the use during the whole trip.


So that's it.  We're off!  Pray for safe travels and a fun trip!

For the rest of the Car Travel Series:


Tuesday, March 12, 2013

Car Travel - Part Five: Alphabet Magnets with Flash Cards

Our trip to California is fast approaching!  I've almost got both girls' car bags ready to go - I'll have a post on what's in it when they're all done.  But for today, I've created some flash cards for my 3-year old to practice letter recognition and working on words.  I bought some magnetic letters at the Dollar Tree and so was limited on what words I created - I couldn't use words that had a letter repeated in the word since my pack of letters only had one of each!  I thought that would be tough, but I ended up with 7 pages with 10 words on each when all was said and done.  Since my daughter can't read yet (hence the practicing), I paired each word with a clip art from Microsoft Word so she can start to recognize the letters and words.

Unfortunately, I made a mistake when I printed them out by putting them all in lower case and then laminating the cards before checking the magnetic letters I had purchased...they were all uppercase!!!!  Ugh!!!  So I've changed the letters in the printable that is below this post, so all of the words are now in uppercase and will match the magnetic letters. But the ones my daughter will be taking on this trip are uppercase letters with lowercase flash cards - hopefully it doesn't cause her too much frustration.  But I'm running out of time to re-laminate 70 cards...


The letters are contained in her cookie sheet (also from the Dollar Tree) and she can practice making the words by matching the letters.  We'll see how long this entertains her.  ;)

To download your own printable (in PDF) of my 70 preschool words that have no
repeating letters, click HERE.

For the rest of the Car Travel Series:

Friday, March 1, 2013

Car Travel: Part Four - Travel Pillow Tutorial

I finally got off the couch and made something with my sewing machine.  I am by no stretch of the imagination a seamstress...but I can sew a straight line with my machine and thankfully this project only required straight lines!  


I was inspired by another blog that had a shot of her child cuddling with a travel pillow and decided that I wanted to make one for each of my girls for the upcoming road trip to California.  It looked simple enough to make and I thought I'd just wing it.  I have several extra pillowcases around the house, so it was just a matter of grabbing two of them and then purchasing a big bag of pillow stuffing.


This bag cost me around $4 or $5 at Walmart.  I didn't get the basic version as I wanted these pillows to be a bit more fluffy and soft than the other fiber was.  This was the next step up.


First things first: clear off my sewing machine and take note of the thread already in there...purple.  Eh, good enough.  ;)  Next, gather the bag of fluff and two pillowcases.  I chose bright pink matching ones so that the girls wouldn't fight over them.


Second, stuff a quarter of one of the pillows with fluff.  Make sure to push gently into the corners.  Then using pins, close up the pillowcase and get ready to sew.


As you sew, make sure to smooth out the fabric underneath.  I didn't on the first one and ended up with bunches under my thread, but it wasn't important enough to me to rip out the seam and smooth it out.  


Third, pull the fluff that was caught on the outside of your seam (and even in the seam) out.


Fourth, smooth out the pillowcase and make another line of pins about 2-4 inches away from your first seam.  This is where the seat belt will go.  Sew that baby shut.


Fifth, stuff more filling in loosely, making sure to push some fluff into the corners of your seat belt buffer seam.  I filled it until the pillowcase's original seam and used it as a reference for my final sewing line.


Sixth, pin up the end of the pillowcase (again, I left about 2 inches on the end...maybe I'll take pinking shears and trim it up, but then again, maybe not...) and sew shut.  Make sure to pull out any escaping fluff once you're done!


All done!  One pillow divided into two pillows with a flat area in the middle.  Each pillow took me about 20 minutes to make from start to finish and that bag of fluff was enough for both pillows.


To use: put pillow between rider and seat belt, then fold over on the flat area and cuddle up against the window!


 They're not perfect (my kids, either!), but I think they will do the job!


Other posts in the Car Travel Series:

Wednesday, February 27, 2013

Car Travel: Part Three - Journey Maps

To help alleviate the "are we there yet?" questions from my eldest daughter, I created a Journey Map for each day of the car ride.  I used Google Maps and just zoomed in on the trip and took a screenshot and copied the screenshot into my photo editing software.  I pieced the screenshots together to have one full shot for my daughter to follow along.  Each day prints into a single sheet and there is a place for her to keep notes if she sees something interesting on the way.  I've seen cute little travel timelines, but since we are renting a car for the journey down, I didn't want something complex that I had to create and install while packing up.  So here is her own compact timeline and she can follow along with a highlighter and highlight our path as we go.  I think this will also help her to see how far we have yet to go or how close we are to our destination.

(for privacy, I am only sharing one of our days)


Other posts in the Car Travel Series:

Sunday, February 24, 2013

Car Travel - Part Two: Alphabet Color by Number

Part two of my "prep for the long car ride from hell" series (AKA the Drive to Disneyland) has a free printable from Reading with Kids.  They have all of these Color By Number sheets there on their website, but each letter was one single page.  I have simply taken their sheets and combined them into one PDF so one could print them all at once.  I did not do the same to their Color by Letter sheets, so if you want to peruse their other printables, go here.

But for the free PDF of the Color by Number sheets (one for each letter - and some look to be somewhat challenging), go HERE.  Below is a couple of sample letters.


My seven-year old was looking on in envy as I printed these out last night...she can't wait to dive into them!  I'm going to dole them out periodically throughout the trip so she doesn't do them all at once!

Car Travel - Part One; Alphabet and Number Dots

We are getting ready for a trip to Disneyland this spring.  The countdown has begun...we're a little over a month away!  So, I've begun to prepare the entertainment binders for our two girls (ages 7 and 3) for the long road trip.  We're not trying to drive from Washington to Los Angeles in one day (thank the Lord), but the journeys will still take between 6-8 hours in the car each of our travel days.  After doing a lot of research, I have started to create printables for the girls and now will be posting them here as free downloads.

Part One: Alphabet and Number Dots

This one is designed for the 3-year old.  She's learning her numbers and letters and loves stickers.  I got the idea here and the gal here will sell this 65-page book with large letters and numbers and others for $5.


I went ahead and created a simple version of my own  of just the numbers and letters I think this simple exercise will keep my little one entertained for a while as she practices her fine motor skills (peeling and sticking the stickers) and her letters and numbers.

 Go HERE to download numbers 1-10

Go HERE to download letters A-Z in both upper and lowercase.  The circles are the right size for the circle dots you find at office supply stores or Walmart/Target.

Monday, January 28, 2013

Chips and Dip Day

Normally, I refer to "Chips and Dip Day" to January 1st.  It's been a tradition in my family to gorge ourselves in junk food and snack foods while the TV is tuned to football all day long.  I love this day, although I get so sick by the end and regret it...!  But I also love trying new dips!  There's something about the old standbys of Onion Dip (sour cream and onion soup mix), Fiesta Ranch (sour cream and HV Fiesta Ranch mix), 7-layer Dip, and Nacho Cheese Dip, and seeing a counter full of different flavors and sampling them all day long.  It's terrible, but wonderful all at the same time!

(my husband being a goof...this is normal)

As Super Bowl Sunday is around the corner, I thought I'd share this year's Chips and Dip Day recipes in time for other parties of snack foods and fattening bellies.  Some of the ones I tried this year were bombs in my opinion, and others were a HUGE hit (and I will probably make it again before next year's Jan 1 just cause it's so wonderful!).  So here was the "line up" for 2013's Chips and Dip Day:

BAKED POTATO DIP

INGREDIENTS:

16 ounces sour cream
16 slices (12-ounce package) bacon, cooked and crumbled
8 ounces sharp cheddar cheese, shredded (about 2 cups)
1/3 cup thinly sliced scallions or chives

DIRECTIONS:

Combine all ingredients in a medium bowl and refrigerate for at least one hour before serving to allow flavors to meld together. Garnish with extra shredded cheese, crumbled bacon, and chopped chives. Serve with your favorite potato chips or pretzel crisps. Dip can be stored in an airtight container in the refrigerator for up to 1 week.

I honestly thought I'd like this dip.  I mean, come on...bacon was a main ingredient!  However, it was bland and very thick (I didn't even put in all 8oz of cheese) - the potato chips kept snapping...needless to say, I had plenty left over after the day was done and it never did get eaten entirely.  BOMB.  Won't be making it again.

CHEESECAKE DIP

INGREDIENTS:
8 oz. package cream cheese
1 tub marshmallow creme
2 tubs cool whip
2 cans cherry pie filling

DIRECTIONS:

Combine first four ingredients and spread pie filling over the top.  Chill until ready to serve.  Serve with graham cracker sticks.


Oh. My. Goodness.  I stood over this dip and just kept eating.  It was pathetic.  I was sorry that I had ever put it out here for my family to enjoy - I wanted this whole thing to myself!!!  SO GOOD!!!!  (And so easy!!!!).  I halved the recipe since I thought it would make too much for the size crowd we were expecting and I'm glad I did.  I also left a quarter of the plate uncovered with cherry pie filling because my husband is not a fan of cherries.  This dip was eaten by the end of the day and I was so sad I had no leftovers.  Hmm...I wonder if I have more pie filling in the pantry right now...


GREEN CHILIES DIP

This one was a flop...only because I made it up.  And not really too much of a flop, but just kind of bland.  I used a can of chopped green chilies (not the smallest, but the next size up), 16oz sour cream, 8 oz mayo, and shredded parmesan cheese.  It tasted fine, but I was looking more for some spice.  Finally a friend of mine gave her recipe to me (the one I was trying to imitate) and I realized it was way off.  The *real* recipe is below (and it will look very similar to the picture!)


SPICY ARTICHOKE DIP

INGREDIENTS:
1 can unmarinated artichoke hearts
1 cup mayo
1 cup shredded parmesan cheese
2 tbs diced jalapenos

DIRECTIONS:

Combine all ingredients (sprinkle additional parmesan cheese on top) and bake at 350 in shallow baking pan for 20 mins.    Serve warm with tortilla chips.

We had other dips as well - my sister's bean dip, the onion and fiesta ranch dip, caramel apple dip, but these three were my new contributions to Chips and Dip Day.  I hope you enjoy them!  What easy dip is your family favorite?